Ever stared at a fully colonized mushroom substrate… and nothing happens? No pins, no growth—just silence. This is where understanding the Mushroom Pinning Trigger becomes a game-changer. It’s the exact moment when your mycelium shifts from growing invisibly to producing real mushrooms. Mastering this stage can mean the difference between disappointment and a thriving harvest.
If you’ve struggled with stalled grows or inconsistent yields, don’t worry—you’re about to learn how to trigger mushroom fruiting the right way.
What Is a Mushroom Pinning Trigger and Why It Matters
What Does “Pinning” Mean?
Pinning is the stage when tiny mushroom buds (pins) first appear on your substrate. These pins eventually grow into full mushrooms. Without proper triggers, your mycelium may never enter this phase.
Why the Right Conditions Are Crucial
The Mushroom Pinning Trigger mimics natural environmental changes that signal mushrooms to reproduce. In the wild, this usually happens after rain, fresh air exposure, and temperature shifts.
Key benefits of proper pinning:
- Faster and more consistent fruiting
- Higher yields and healthier mushrooms
- Reduced contamination risk
Signs Your Substrate Is Ready
Before triggering pinning, ensure:
- Full white colonization
- Slight surface moisture (not soggy)
- Fresh, earthy smell (no foul odors)
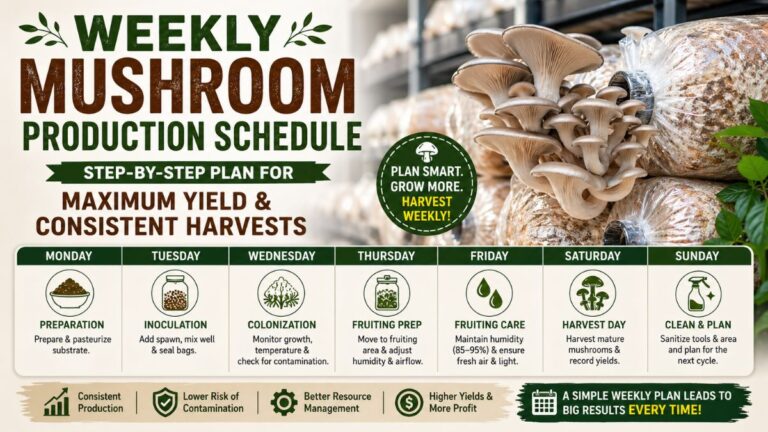
Step-by-Step Guide to Trigger Mushroom Fruiting
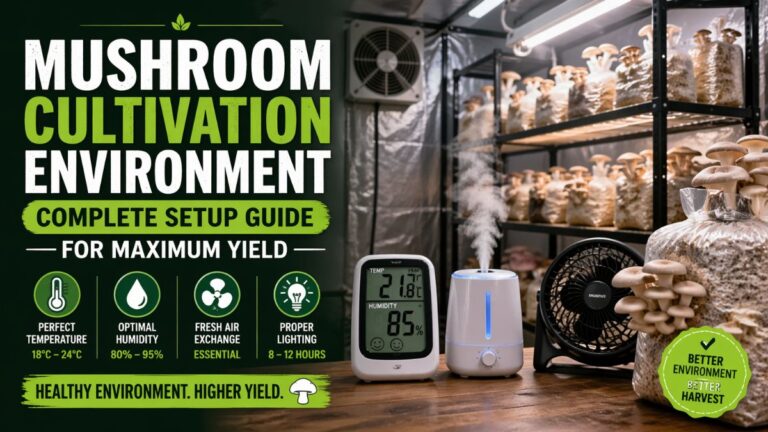
Step 1: Increase Fresh Air Exchange (FAE)
One of the most important mushroom pinning conditions for beginners is oxygen.
- Open vents or fan the grow area lightly
- Reduce CO₂ buildup
- Avoid strong direct airflow
Fresh air tells the mycelium it’s time to fruit.
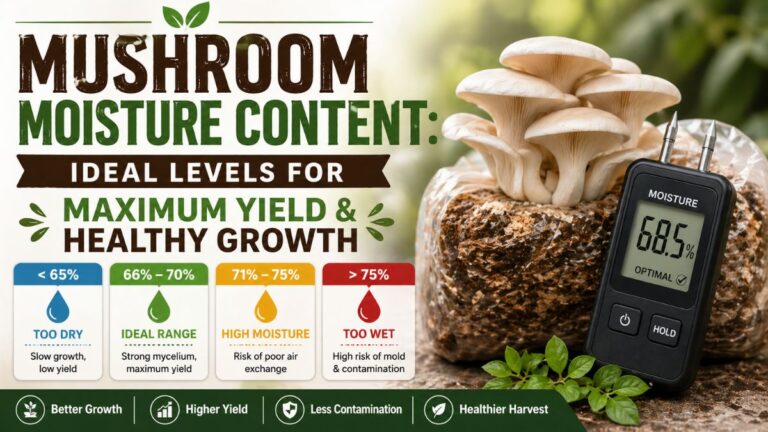
Step 2: Adjust Humidity Levels
Humidity plays a critical role in ideal humidity for mushroom pinning.
- Maintain 85–95% humidity
- Mist lightly if the surface dries
- Avoid overwatering (this can suffocate pins)
Step 3: Lower the Temperature Slightly
A small drop in temperature acts as a seasonal signal.
- Reduce by 2–5°C from incubation temperature
- Keep conditions stable (avoid fluctuations)
Step 4: Introduce Indirect Light
Light is often overlooked but essential.
- Use soft, indirect light (natural or LED)
- 8–12 hours daily is enough
- Avoid direct sunlight
Step 5: Maintain Surface Moisture
Tiny water droplets on the surface encourage pin formation.
- Aim for a glistening surface
- Avoid pooling water
Expert Tips, Common Mistakes and Best Practices
Pro Tips for Successful Pinning
If you want to truly master how to initiate mushroom pinning, follow these expert tips:
- Be consistent—sudden changes can stress mycelium
- Use a clean, sterile environment
- Monitor daily but avoid over-handling
Common Mistakes to Avoid
Many growers fail at this stage due to simple errors:
- ❌ Over-misting leading to waterlogged substrate
- ❌ Poor airflow causing CO₂ buildup
- ❌ Skipping light exposure
- ❌ Triggering too early before full colonization
Safety and Hygiene Precautions
Healthy mushrooms start with a clean setup:
- Wash hands before handling
- Use sanitized tools
- Remove contaminated sections immediately
Why Mastering the Pinning Trigger Matters
Understanding mushroom fruiting conditions step by step gives you full control over your grow cycle. Instead of guessing, you’ll know exactly what your mushrooms need—and when.
To make things even easier, you can use this free tool to fine-tune your conditions:
👉 https://mushroomcalculators.com/tool/mushroom-pinning-trigger-calculator/
FAQs:
1. How long does it take for pins to appear?
Pins usually appear within 3–10 days after applying the correct Mushroom Pinning Trigger conditions.
2. Can mushrooms pin without light?
They can, but light significantly improves pin formation and growth direction.
3. What is the most important pinning trigger?
Fresh air exchange is often the most critical factor, followed closely by humidity and surface moisture.
Conclusion:
The secret to successful mushroom growing isn’t luck—it’s control. By understanding the Mushroom Pinning Trigger, you unlock the ability to turn fully colonized substrate into a thriving, productive harvest.